
This tutorial is designed to give you a head start on the many ways you can customize a drop-down menu in Dreamweaver.
Adobe Dreamweaver CS3 and CS4 include the Spry framework, a set of widgets you can use to create drop-down menus and other advanced features for your web pages.
The Spry menus make adding a drop-down menu in Dreamweavereasier, but you’ll still need a basic understanding of CSS and how to edit styles if you want to change the colors, fonts, or other settings in these menus.
The first step is to understand what CSS rules control each of the options inthe menu. There are many ways to create and apply styles and until you understand the style sheets that come with the drop-down menus in Dreamweaver, it hard to know where to make adjustments to the styles that control the color, size, and other attributes.
Editing a menu can get complicated, but if you take your time and you’re open to experimenting a little, you can change these menus to fit your design.
1 INSERT A SPRY DROP-DOWN MENU IN ADOBE DREAMWEAVER
 The first step is to create or open a page with a drop-down menu created using Spry. If you haven’t already inserted a drop-down menu into your page (see this tutorial for more detailed instructions on creating menus).
Here’s a quick tutorial on how to insert a Spry menu:
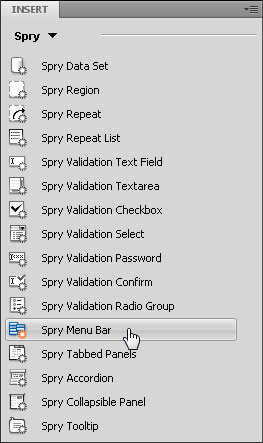
First open the Spry menu options. You can open and close the Spry options from the Insert menu (which may be at the top-left or top right of your workspace depending on whether you are in Classic or CS4 Design view.)
The Spry menu is an option in the drop-down list and once selected, opens a list of widgets you can use to add AJAX features.
Before you insert the menu, place your cursor where you want to the menu in your web page. When you click on the Spry Menu Bar icon the menu will be created at the position of your cursor. (see this tutorial for more detailed instructions on creating menus).
Read through the steps below to learn how to alter the appearance of a drop-down menu created with Spry in Dreamweaver.
2 CREATE HORIZONTAL OR VERTICAL MENUS

As you insert a Spry Menu Bar, you have the option to create a menu that displays horizontally across your page with submenu options that drop down below the menu bar, or a vertical menu bar with submenu options that open to the right of the main menu items.
You must make this choice during the setup process by clicking on the corresponding button and then clicking OK to insert the menu. Once the menu bar is inserted, you can’t change its orientation.
3 FIND THE STYLE YOU WANT TO EDIT
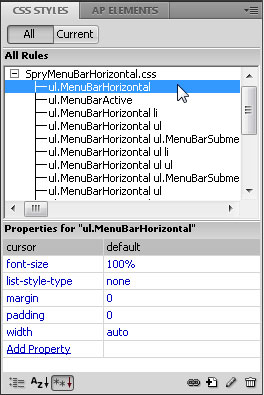 Open the CSS Styles panel (Window>CSS Styles). Click the All button at the top of the panel and twirl open SpryMenuBarHorizontal.css.
Click-and-drag the top of the Properties pane in the CSS panel (shown here) until you can see the list of your styles and their defined rules.
A good way to start is to click on each of the style names in the All Rules list and review their settings in the Properties pane.
Look for color, font, and size settings, which you’re likely to want to change. In the next few steps, we’ll cover several of these styles specifically.
4 ADJUST MENU ALIGNMENT OPTIONS
 Like most options for a horizontal menu, the alignment is controlled by a CSS style.
By default, the horizontal menu aligns to the left of the page, but you can align it to the right by changing the definition of the style named, “ul.MenuBarHorizontal li.”
Click on the name of the style in the CSS Styles panel and then in the Properties pane, click just to the right of the Float field to use the drop-down list, and select Right instead of Left.
If you prefer, you can double-click the style name to open the CSS Rule Definition dialog.
5 CHANGE ROLLOVER COLORS
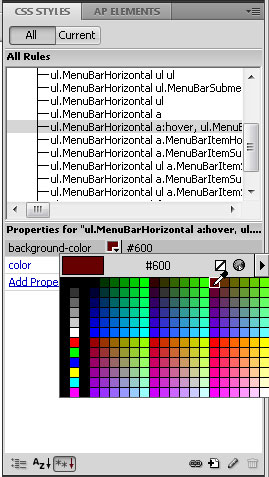 The trick to changing the colors of the drop-down menu items is that in CSS, these colors are assigned to the link styles, which have multiple states.
To change the background and text colors of links as they display when a page first loads, you’ll need to edit the style named, “ul.MenuBarHorizontal a.”
To change the colors that appear when you roll a cursor over a link, edit the background and text colors in the style, “ul.MenuBarHorizontal a.MenuBarItemHover, ul.MenuBarHorizontal a.Menu….”
Note: If you created a vertical menu, these style names will include “Vertical” instead of “Horizontal.”
6 TEST YOUR WORK EARLY AND OFTEN
Many changes to these styles are only visible when you view the page in a Web browser or in the new Live View option (available in Dreamweaver CS4).

If you click on the Live View button at the top of the workspace, you can preview the page and test interactive effects, such as rollovers, without leaving Dreamweaver.
This is a handy way to check things, such as whether the rollover color is set the way you want it.
Don’t be afraid to experiment; you can always change the style definitions back if you don’t like the way something looks.
7 CHANGE THE FONT FACE AND SIZE
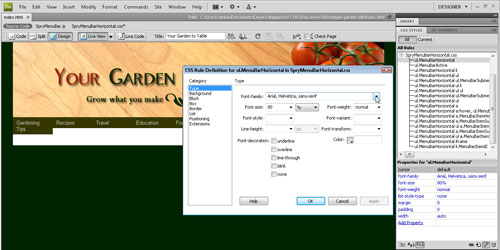
By default, a Spry drop-down menu will display in the font specified in the body style—or in the closest parent style—for the page.
You can alter your drop-down menus so that the font is different than other text on the page by adding a font style to the style named, “ul.MenuBarHorizontal.”
Double-click on the name of the font to open it in the CSS Rule Definition dialog (shown here) and then enter a font face or choose a font collection from the Font-family drop-down menu.
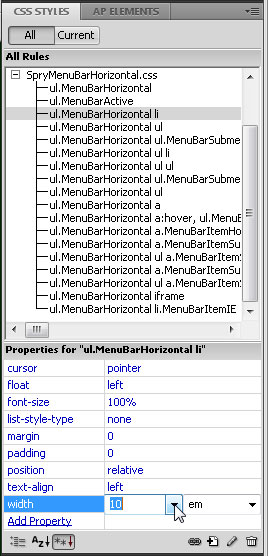 8 CHANGE THE WIDTH
OF DROP-DOWN MENU ITEMS
You can change width settings in the style named “ul.MenuBarHorizontal li.” By default, the width is set to 8 em.
For those not familiar with the em option, it specifies sizes based on the size of the letter M in the font face used in the style.
This flexible option is a great way to set the width of these link boxes to best fit their contents.
If you have longer names and they wrap, you can increase this size, for example to 10 em, to get all of the text on one line.
A little goes a long way with em sizes.
9 CHANGE THE WIDTH OF SUBMENU ITEMS, TOO
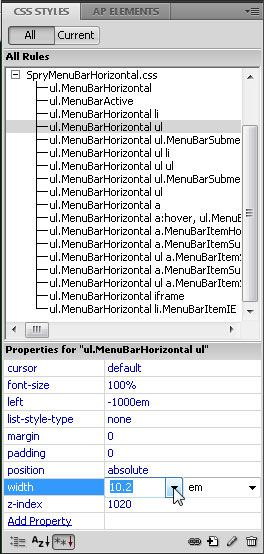 If you want the drop-down items that appear below each menu item to display in the same width as the main menu item, you’ll have to adjust the Width setting.
There are two different styles that control the appearance of the drop-down list items “ul.MenuBarHorizontal ul” and “ul.MenuBarHorizontal ul li.”
Again, a little goes a long way when adjusting em sizes, and you’ll notice a slight difference with these two.
If you change the main link width from 8 em to 10 em, you should change the corresponding 8.2-em Width setting to 10.2 in the styles named “ul.MenuBarHorizontal ul” and “ul.MenuBarHorizontal ul li.”
10 EDIT MENU ITEMS IN THE PROPERTY INSPECTOR
When a menu bar is inserted, Dreamweaver includes placeholder text for several menu items and submenu items, such as Item 1, Item 2, etc.
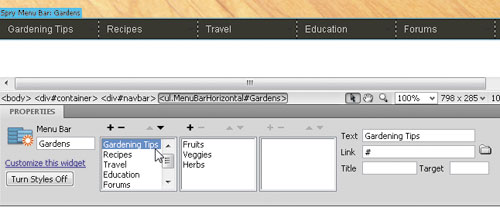
To edit menu and submenu items, click the blue Spry Menu Bar tab (at the top-left of the menu in the workspace) to select it and then use the settings in the Property inspector.
Simply click on the menu item or submenu item that you want to change and then select the text in the Text field on the right and then type over it to replace it.
11 ADD ITEMS TO DROP-DOWN MENUS AND SUBMENUS
To add menu or submenu items click the plus (+) sign at the top of the corresponding menu field, or click the minus (-) sign to delete an item.
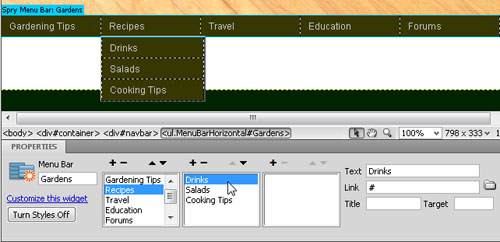
For example, you can add a third-level menu item by selecting a submenu item and then clicking the plus sign above the third menu field.
Be sure to change or add text in the Text field in the far right of the Property inspector.
12 CREATE AND EDIT MENU LINKS
To turn any menu item into a link, select the item in the Property inspector and enter the URL in the Link field.
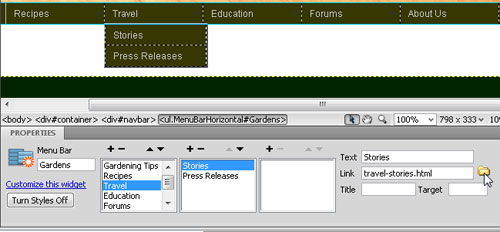
You can also use the browse button (hint: it looks like a yellow file folder) to locate and select any file in a website and set the link automatically.
If you’re setting a link to a top-level menu item, you can also select the text in the main workspace and set the link in the Property inspector, or use the Hyperlink icon in the Common Insert menu.
13 PREVIEW IN A WEB BROWSER TO TEST YOUR DROP-DOWN MENU AND LINKS
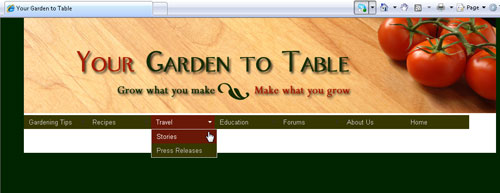
To fully test a drop-down menu, you’ll need to preview your page in a Web browser, such as Safari, Internet Explorer (IE), or Firefox.
Ideally, you should test using all three of these browsers (and others) to ensure that the menu works well for all your visitors.
Drop-down menus can be especially tricky when it comes to displaying in different Web browsers.
If you’re having trouble with IE and you’re viewing the menu on your local computer, make sure you click to Allow Blocked Content at the top of the browser window.