
Server side includes (SSI) help make your website easy to maintain. As your site grows it becomes more and more difficult to make changes that affect the entire site. Imagine adding a new link from the menu and then updating and uploading all the pages everytime you add a new page!
If you make the menu into a server side include, you can add the link to this include file alone and upload it to your hosting server. All the pages of your site will access this menu include and therefore reflect the new link!
You can make different includes for different submenus which will display in the different sections of your site – one for the services section, one for the products section etc. However you need to ensure that your hosting server supports SSI in order for it to work. If not, you could use Dreamweaver libraries for the different submenus as you can have only one in the template.
Before you Begin Project 3:
- If you are a beginner make sure you go through steps 1- 10 of the Dreamweaver CS3 Tutorial before attempting this project.
- You should have completed Project 2 as you will be using the same files, or you can simply download the final project 2 files and define a site for it in Dreamweaver.
- Download the final project3 files (DWCS3_ssi.zip, 32 KB) so you can take a look at it in case you run into any difficulties.
We will make the header, menu and footer into server side includes.
- Open the template_css.dwt file
- Click somewhere within the header. Click on <div#header> at the bottom of the document window. Cut (Edit > Cut)
- Make a new html page (File > New> Blank Page > HTML > <none>
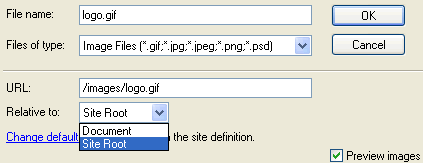
Get into the code view. Select all the code and delete all the code. Get back into the design view. Save it as a file called “header.html” into a folder called “includes” in the root folder. - Click on the logo image and make the image source path ‘relative to site’ (not relative to document). A site relative path will always begin with a “/”. Basically this means that the path to the link or image will always be taken from the site root and not relative to the current document. This is important since the includes could be used in any web page, so the path to the image/ link, relative to the document, may be different while the path from the site root will always remain constant. Repeat for any other images or links.
- Go back into the template file. Insert the header include. Insert > Server Side Include > browse to the includes folder and select “header.html”
- Repeat the process for the menu div <#menu> and footer div <#footer>
- Save the template and update all the pages.
- Change the page extensions of the web pages to .shtml from .html eg. about.shtml. If the web page is named with the extension .html, the includes will not show up in the browser. Click yes when asked if the links to these pages should be updated accordingly.
- If you have IIS installed on your computer you can put the site in your inetpub folder and preview it from http://localhost. Otherwise you will need to upload it to your remote hosting server to see if everything is working fine. Ensure that your remote server supports server side includes (SSI).
- Congratulations! Your easy to maintain site with server side includes (SSI) is now live!
In order to make you website live you will need to sign up with a hosting server. I recommend Hostgator which I use to host this site.
Check out the Spry tutorial – a new feature in Dreamweaver CS3 which allows you to add in AJAX components into your website without knowing any AJAX coding.