
Preview in Browser
- File > Preview in Browser > select the browser of choice
- View each page
- Click on all the links
Note: If you use Site Relative paths (as you must in server side includes), the “Preview in Browser” feature will not work. You will need to test on a web server locally or upload to your remote hosting server and test.
Other tools that Dreamweaver provides :
- Site > Check Links Sitewide
- Text > Check Spelling
Going Live
After you have developed and tested your site it is ready to go live. You will need to sign up with a hosting server. I recommendHostgator which I use to host this site.
Once you sign up with a hosting server you they will provide you with your server details:
- IP address or www.yoursitename.com
- username
- password
You can use Dreamweaver or any FTP software e.g. Filezilla to upload your files to the remote hosting server.
File Upload/ FTP in Dreamweaver
To enter your hosting details into Dreamweaver:
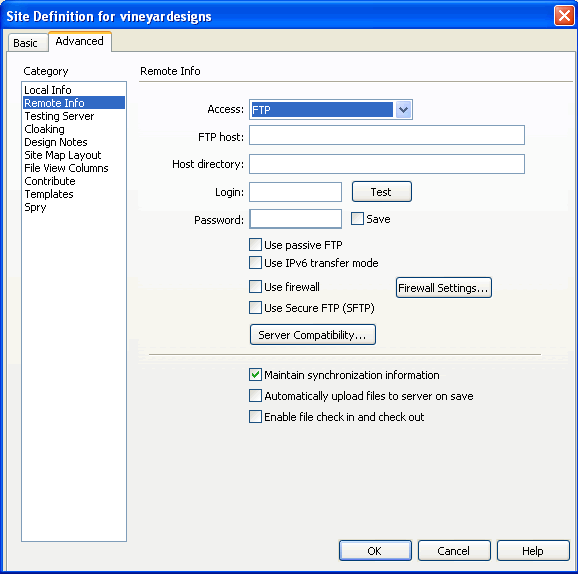
- Fill in these details in the Remote Info Panel of the Site Definition [Files Panel > Last in the site name drop down – Manage Sites > Select the Site > Click Edit > In the Advanced Tab > Click the category “Remote Info”
- Access = FTP (from drop down menu)
- FTP host = enter your site url e.g. www.yoursitename.com
- Enter your login and password
- Click “Test” to check the connection
To upload your files into the remote hosting Server:
- Click the “Expand to show local and remote sites” icon
 in the Files Panel

- In the expanded files panel click the ‘connects to remote host’ icon.
- Once you connect you should see the remote folder and files on the left window.
- To upload your files click the ‘Put Files’ Arrow icon in the site manager.
- After uploading all the files test the site online using your site url e.g. www.yoursitename.com.

Your site is live now! Congratulations!